
How-to deploy Windows Virtual Desktop in Azure
If you want to know how to manage WVD, check this post.
Index
1. Add RDS Tenant
2. Add Service Principal
3. Assign permissions
4. Deploy WVD through marketplace
5. Open HTML5 webclient
6. Add users to your desktop
I see a lot of people struggle deploying Windows Virtual desktop. Most people face this error message:
VM has reported a failure when processing extension 'dscextension'. Error message: \\\"DSC Configuration 'FirstSessionHost' completed with error(s). Following are the first few: PowerShell DSC resource MSFT_ScriptResource failed to execute Set-TargetResource functionality with error message: User is not authorized to query the management service
This is because you need to create a service principal with the correct permissions. A normal user will work as well, but it’s failing too many times for people.
Following these steps should get you through the deployment.
Keep in mind that the user deploying your WVD VMs to your domain, also needs the Owner role on your Azure Subscription! Because it needs to be able to run some Powershell DSC commands.
NOTE: User ‘Cloudcrusader’ suggests in the comments that it should work with the ‘Virtual Machine Contributor’ role only as well.
Start fresh. Delete all WVD tenants created before. Check if a tenant still exists with Get-RdsTenant.
This post is not going to help you, configuring WVD with AAD DS. It should be possible though, someone was able to configure it succesfully using this post.
Remember, don’t use an MFA enabled account. It doesn’t work.
Also try: Get-RdsDiagnosticActivities. Others succeeded finding the root cause with that command
I have deployed WVD multiple times already, so that’s how I know this works. If it doesn’t work for you, let me know, maybe I can help you.
Run through step one of the Microsoft documentation:
https://docs.microsoft.com/en-us/azure/virtual-desktop/tenant-setup-azure-active-directory
Add RDS tenant
Run these commands to add the RDS tenant.
2
3
4
Add-RdsAccount -DeploymentUrl "https://rdbroker.wvd.microsoft.com"
# Use any name for your tenant, get your ID from Azure portal > Azure Active Directory > Properties > Directory ID. To get your SubscriptionID, go to Azure Portal > All services > subscriptions > click the subscription where the VM's will reside and copy the subscription ID:
New-RdsTenant -Name YourTenantName -AadTenantId YourAzureADTenantID -AzureSubscriptionId YourSubscriptionID
Add Service Principal
Next, follow these steps. Never change the Default Tenant Group, as per the Microsoft docs.
2
3
4
5
6
7
8
9
10
11
12
13
$myTenantName = "tenantname" #As you used in the previous step
$hostpoolname = "Hostpoolname"
# create the service principal:
$aadContext = Connect-AzureAD
$svcPrincipal = New-AzureADApplication -AvailableToOtherTenants $true -DisplayName "Windows Virtual Desktop Svc Principal"
$svcPrincipalCreds = New-AzureADApplicationPasswordCredential -ObjectId $svcPrincipal.ObjectId
# Don't change the URL below.
Add-RdsAccount -DeploymentUrl "https://rdbroker.wvd.microsoft.com"
Set-RdsContext -TenantGroupName $myTenantGroupName
New-RdsHostPool -TenantName $myTenantName -name $hostpoolname
Assign permissions
Now below is the most important step, that’s where you assign the service principal permissions to the RDS environment. If you do this correctly, you can deploy the WVD template from the Azure Marketplace, without errors.
Go to the Azure Portal and open the app just created and create your own key:
Azure Portal > app registrations > Windows Virtual Desktop Svc Principal > Settings > Keys.
Create your own key and save the value During the next step, deploying Windows Virtual Desktop from the marketplace, in step 3 of that template you need this password.
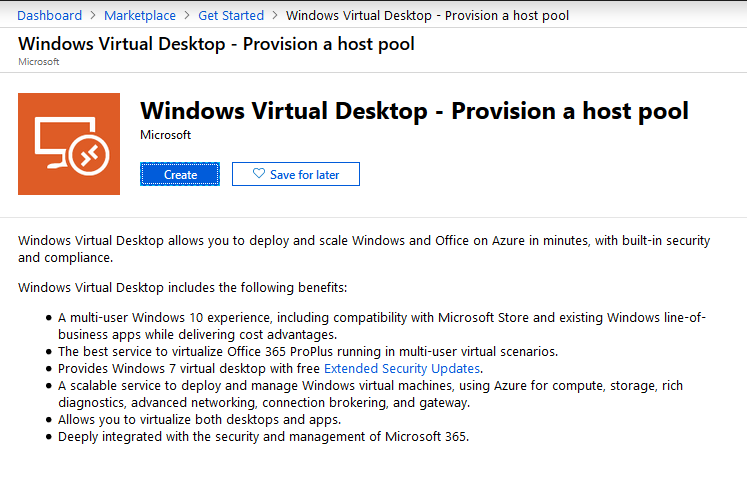
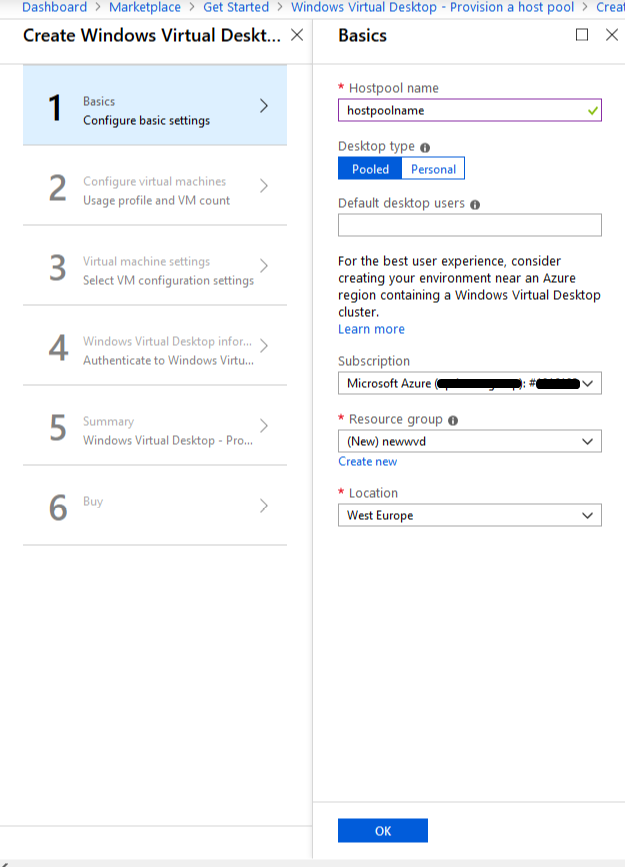
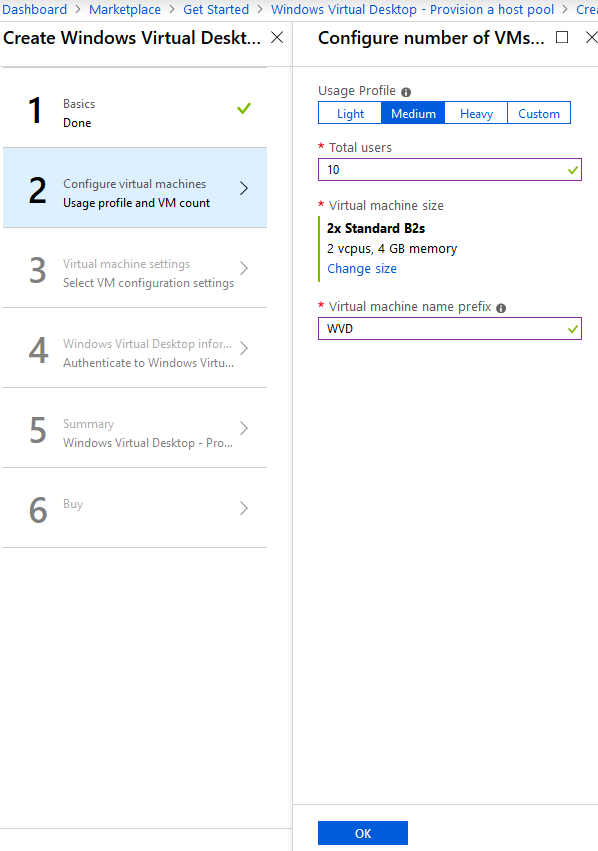
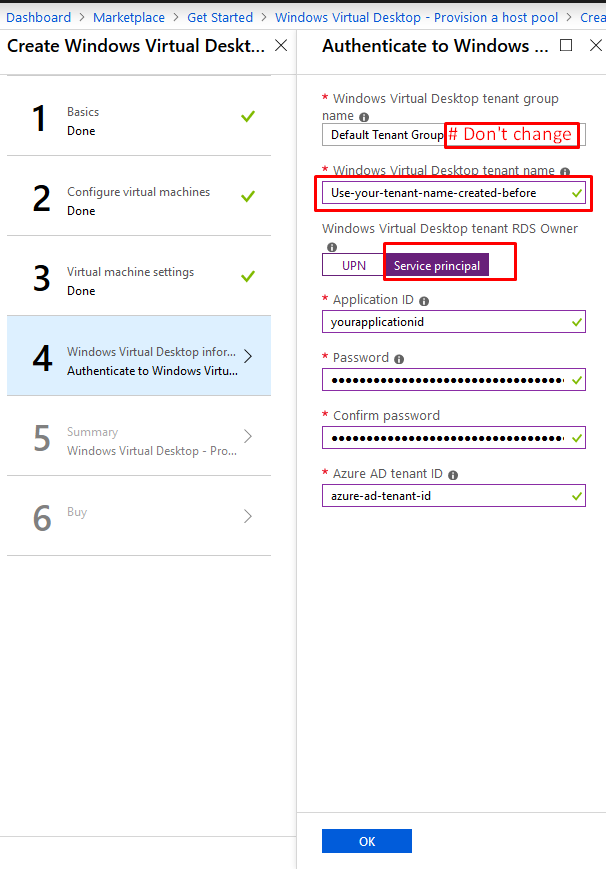
Deploy WVD through marketplace
Next step is to follow this Microsoft doc:
https://docs.microsoft.com/en-us/azure/virtual-desktop/create-host-pools-azure-marketplace
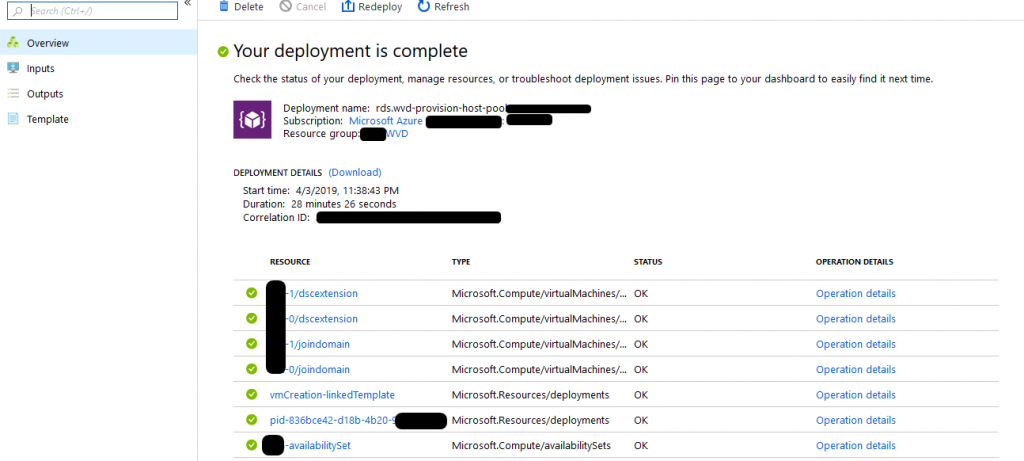
You should be able to get passed the error as mentioned above, also with help from these screenshots below.
If you keep No selected below Specifiy domain or OU, it’s going to try joining the domain behind the @, used below AD domain join UPN. So in the example below it will use yourdomain.com. If your domain is ad.yourdomain.com, set Yes below the Specifiy domain or OU.

Finally, your deployment is succesful as you can see in the screenshot below. It took about 9 minutes for the DSCextension completed, per VM:
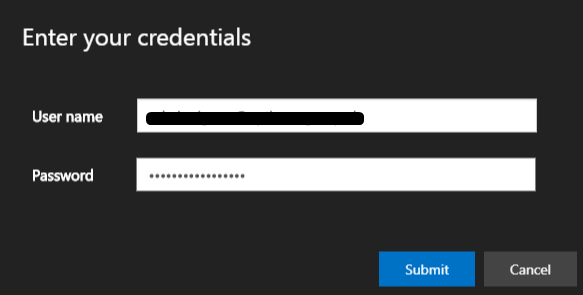
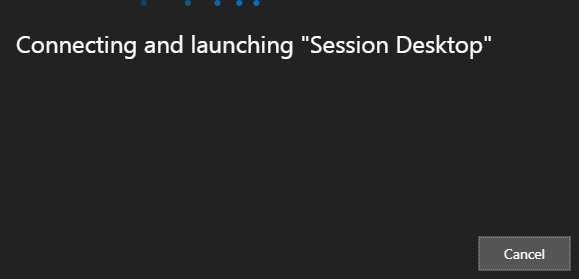
Open HTML5 webclient
Now go to the HTML5 client to open your desktop: https://rdweb.wvd.microsoft.com/webclient/index.html

Add users to your desktop
As a final step, add users to your desktop:
Thanks for your example of a setup. Unfortunately, I got stuck at the same place as the last 3 or 4 times I’ve tried a deployment of Windows Virtual Desktop. Seems to be some trouble joining the domain. Just in case you have any clues you can pass on to me, below is the error.
Bill
{“code”:”DeploymentFailed”,”message”:”At least one resource deployment operation failed. Please list deployment operations for details. Please see https://aka.ms/arm-debug for usage details.”,”details”:[{“code”:”Conflict”,”message”:”{\r\n \”status\”: \”Failed\”,\r\n \”error\”: {\r\n \”code\”: \”ResourceDeploymentFailure\”,\r\n \”message\”: \”The resource operation completed with terminal provisioning state ‘Failed’.\”,\r\n \”details\”: [\r\n {\r\n \”code\”: \”VMExtensionProvisioningError\”,\r\n \”message\”: \”VM has reported a failure when processing extension ‘joindomain’. Error message: \\\”Exception(s) occured while joining Domain ‘wbhydebillhyde.onmicrosoft.com’\\\”.\”\r\n }\r\n ]\r\n }\r\n}”}]}
Hi Bill, are you using AAD DS? I believe that’s currently not working.
Also, on step 3 from the Marketplace template, if you use administrator@yourdomain.com, it will try to connect to yourdomain.com.
If your domain is ad.yourdomain.com, choose “Yes” below the option “Specifiy domain or OU”.
And by the way, this is a “standard” domain join. Check the eventviewer on your domain controllers for the error.
Hi Erjen I am using AAD DS and tested with domain join function with Iaas VM and even while deploying the WVD domin joining stage get successfully completed. I am following your steps now and while creating hostpool through PS getting same error which I got while deploying from portal.
PS C:\Users\136424> New-RdsHostPool -TenantName $TenantGroupName -Name $hostpoolname
New-RdsHostPool : User is not authorized to query the management service.
ActivityId: 5ab89bb2-fdbd-4dab-b729-c2219e0b0b77
Powershell commands to diagnose the failure:
Get-RdsDiagnosticActivities -ActivityId 5ab89bb2-fdbd-4dab-b729-c2219e0b0b77
At line:1 char:1
+ New-RdsHostPool -TenantName $TenantGroupName -Name $hostpoolname
+ ~~~~~~~~~~~~~~~~~~~~~~~~~~~~~~~~~~~~~~~~~~~~~~~~~~~~~~~~~~~~~~~~
+ CategoryInfo : FromStdErr: (Microsoft.RDInf….NewRdsHostPool:NewRdsHostPool) [New-RdsHostPool], RdsPowerShellException
+ FullyQualifiedErrorId : UnauthorizedAccess,Microsoft.RDInfra.RDPowershell.HostPool.NewRdsHostPoo
i had same issue – i have a split dns. once i used the UPN of the domain i wanted it to join to it worked.
i.e. my email is joe@test.com, but my domain is testing.com. so i had to set my upn to joe@testing.com. it pulls the jointodomain from the domain in your email.
Thank you for the nice write up; I enjoyed it.
Is there any way to allow a service principal to have Tenant Creator rights? The commander certainly has an option to use an SP to authenticate. I’d appreciate any help!
Hi Erjen, how did you set up your AD environment? Did you spin up an AD DC using Azure IaaS and installing ADconnect then creating the virtual desktop in that virtual network?
Hi Heng, no we have an working AD Connect in place already. If you only have AAD DS, you should be able to install succesfully: https://techcommunity.microsoft.com/t5/Windows-Virtual-Desktop/Error-User-is-not-authorized-to-query-the-management-service/m-p/429962/highlight/true#M261
Hi Erjen,
Can you recommend any further troubleshooting steps to those still experiencing a similar ‘dscextension’ error, even after switching from a user UPN to a service principal? In my case, I receive the following error message:
VM has reported a failure when processing extension ‘dscextension’. Error message: DSC Configuration ‘FirstSessionHost’ completed with error(s). Following are the first few: PowerShell DSC resource MSFT_ScriptResource failed to execute Set-TargetResource functionality with error message: One or more errors occurred. The SendConfigurationApply function did not succeed.
Appreciate your thoughts!
Ricardo
Hi Ricardo,
I have seen that error before. In my case it was having too many tenants, app groups etc.
Try to start clean, see if you have existing tenants and remove them:
Also this step is very important:
You can also try adding the user here, which you use deploying WVD through the marketplace:
Also, double check if your user has owner rights on your Azure subscription.
Hi Eren,
Thanks for posting this. How do we go about clearing everything out? I want to delete it all and start from scratch. What command or GUI steps are required for this?
Hi,
Can I use Microsoft Licensing Pay-as-you-go (OnDemand) or I need have a licensing M365 for Windows 10 or CAL RDS for Windows Server?
You can use pay as you go, just check the pricing page:
https://azure.microsoft.com/en-us/pricing/details/virtual-desktop/
Hi,
great blog!
It probably would work to if you assign the user ‘Virtual Machine Contributor’ role on the Resource group instead of owner on the whole subscription 😉
Thanks Cloudcrusader, I edited the post suggesting your advise.
Hi Erjen
I still run in the issue below wenn I try to deploy a Host Pool through the Market Place. I have tried by creating the Host Pool before the Market Place, granting the RDS Owner to the Service Principal (as explained in your blog) or let the Market Place create the Host Pool directly. All the pre-requistes (clean up of Tenants, Subscription owner, account does not use MFA,..) are met. I have no more ideas ……
VM has reported a failure when processing extension ‘dscextension’. Error message: \”DSC Configuration ‘FirstSessionHost’ completed with error(s). Following are the first few: PowerShell DSC resource MSFT_ScriptResource failed to execute Set-TargetResource functionality with error message: One or more errors occurred. The SendConfigurationApply function did not succeed
Hi Maurizio,
You did check my resonse to Ricardo right? IF that didn’t help either, I am afraid I can’t help you without reviewing your environment..
Hi Erjen,
I followed your instructions and I thought everything is fine until I noticed that I’m not able to connect the virtual machine. I compared everything and it looks normal but if I try to connect, it doesn’t work. I’m a global admin, owner and also Contributor. I think more is not possible. It looks like a permission issue but how can I solve it?
Here the error message:
Get-RdsDiagnosticActivities : User is not authorized to query the management service.
ActivityId: 766490cd-ce6a-4c30-aa60-6fefda38b5b0
Powershell commands to diagnose the failure:
Get-RdsDiagnosticActivities -ActivityId 766490cd-ce6a-4c30-aa60-6fefda38b5b0
At line:1 char:2
+ (Get-RdsDiagnosticActivities -TenantName $tenant -ActivityId ‘ba46448 …
+ ~~~~~~~~~~~~~~~~~~~~~~~~~~~~~~~~~~~~~~~~~~~~~~~~~~~~~~~~~~~~~~~~~~~~
+ CategoryInfo : FromStdErr: (Microsoft.RDInf…osticActivities:GetRdsDiagnosticActivities) [Get-RdsDiagnosticActivities], RdsPowerShellException
+ FullyQualifiedErrorId : UnauthorizedAccess,Microsoft.RDInfra.RDPowershell.Diagnostics.GetRdsDiagnosticActivities
Hi George,
Great this blog works out for you.
Did you check my blog how to manage and add users? https://erjenrijnders.nl/2019/05/03/how-to-manage-windows-virtual-desktop/
Yes, I did it and I checked everything twice. Now one day later the behavior is changed. I am able to connect the WVD via the web interface. I opened an incognito browser window and go to the URL , logged in and it works.
But the remote desktop client is still not working and the error is still the same (User is not authorized to query the management service.)
It doesn’t make sense to me.
It is weirder as I thought. I checked it on my home workstation and it works immediately, both RDG and WEB. Obviously is the workstation in my office the reason for that problem.
I have seen that before as well, we checked Windows build numbers etc. For one device we were able to workaround this problem by disabling NLA on the WVD. But still another device kept these problems. WVD is still preview so we should wait for the final version.
Hi Erjen
Just for your information: I reported a problem in my comment at 06/05/2019, 10:00 am.
Now it works. In our environment the solution was to create a new Azure subscription because the “standard” one has Policy applied to it and apparently some settings impede to deploy WVD.
Hi Maurizio,
Great it works now and thank you for your feedback. I’ll keep your solution in mind!
Hi, what kind of subscription do you use?
Thanks
Hi Erjen,
I have created the host pool using the Service Principal and have a Azure AADS and no domain controller.
I am receiving an error in the last stage where it says like below,
extension ‘dscextension’. Error message: \”DSC Configuration ‘FirstSessionHost’ completed with error(s).
Following are the first few: PowerShell DSC resource MSFT_ScriptResource failed to execute Set-TargetResource
functionality with error message: User is not authorized to query the management service.
Any thoughts/ideas will be really appreciated, i have tried running thrice and still the same. i even tried with UPN instead of Service principal and no MFA on the account but no luck
Hi Mohsin,
If you followed my blog very carefully, I believe you have taken al the necessary steps. If it still doesn’t work, it’s not that easy to tell what’s going wrong.
If you want, I can assist you, please contact me directly.
Hi Erjen,
How do we delete previous pools so we can start from scratch?
Use:
And:
Use:
And:
Hi Erjen,
When I run Set-RdsContext I get a error messgae saying ” Set-RdsContext : TenantGroup: ‘Default Tenant Group’ does not exist”.
Also New-RdsHostPool -TenantName $myTenantName -name $hostpoolname thows the error ” New-RdsHostPool : User is not authorized to query the management service.”
The user I am using is a Global Admin, Tenant Creator, Subscription owner.
Any suggestions??
What is the result of:
?
Its the same output as Add-RdsAccount -DeploymentUrl https://rdbroker.wvd.microsoft.com
NOTE : I am using only AzureAD with Domain services enabled. No AD Connect
Same output as Add-RdsAccount -DeploymentUrl command.
NOTE : I am using only Azure AD Domain services without AD Connect.
That shouldn’t make any difference at this point.
Try:
I think the RDS tenant is not even created if you get that error message.
Hey Thanks for your post
i have deployed Windows 7 Machine in Windows Virtual Desktop Pool
i am struck at ”dscextension’ below is the error message
{“code”:”DeploymentFailed”,”message”:”At least one resource deployment operation failed. Please list deployment operations for details. Please see https://aka.ms/arm-debug for usage details.”,”details”:[{“code”:”Conflict”,”message”:”{\r\n \”status\”: \”Failed\”,\r\n \”error\”: {\r\n \”code\”: \”ResourceDeploymentFailure\”,\r\n \”message\”: \”The resource operation completed with terminal provisioning state ‘Failed’.\”,\r\n \”details\”: [\r\n {\r\n \”code\”: \”VMExtensionProvisioningError\”,\r\n \”message\”: \”VM has reported a failure when processing extension ‘dscextension’. Error message: \\\”DSC Configuration ‘FirstSessionHost’ completed with error(s). Following are the first few: PowerShell DSC resource MSFT_ScriptResource failed to execute Set-TargetResource functionality with error message: One or more errors occurred. The SendConfigurationApply function did not succeed.\\\”.\”\r\n }\r\n ]\r\n }\r\n}”}]}
Could you please help here, Thanks
if possible can you please ping or over Teams or Skype with ramesh.chenagoni@techwave.net or share me your mail id, Appreciate immediate help
Hi Ramesh,
See my reply to Ricardo. If that doesn’t work you can contact me by using the contact form.
Hi Erjen. Great information provided in your post. Sadly, I had followed all the step mentioned here and in the MS official documentation and I am still riding with the issue of the permission.
RoleAssignmentId : 8d76933b-d320-4d27-74ad-08d7615798f3
Scope : /Default Tenant Group/PGWVDAZURE
TenantGroupName : Default Tenant Group
TenantName : PGWVDAZURE
DisplayName :
SignInName : jibarra@perceptiongroup.com.ar
GroupObjectId : a2a5471c-7d66-45ca-a632-42632922a94a
AADTenantId : 45d78b88-cec7-4958-940b-2b9785e5b080
AppId : fa4345a4-a730-4230-84a8-7d9651b86739
RoleDefinitionName : RDS Owner
RoleDefinitionId : 3b14baea-8d82-4610-f5da-08d623dd1cc4
ObjectId : 2aab8d91-a5ba-4e9e-6918-08d75e74bb90
ObjectType : User
Item :
RoleAssignmentId : 9656d774-6b56-4532-74af-08d7615798f3
Scope : /Default Tenant Group/PGWVDAZURE/PGWVDPool
TenantGroupName : Default Tenant Group
TenantName : PGWVDAZURE
HostPoolName : PGWVDPool
DisplayName :
SignInName :
GroupObjectId : 00000000-0000-0000-0000-000000000000
AADTenantId : 33e01921-4d64-4f8c-a055-5bdaffd5e33d
AppId : 3148c4ea-9115-43a7-8ee6-2146f830e554
RoleDefinitionName : RDS Owner
RoleDefinitionId : 3b14baea-8d82-4610-f5da-08d623dd1cc4
ObjectId : cde92edc-943f-41db-7c2e-08d7614c5e2c
ObjectType : ServicePrincipal
Item :
Clearly here the problem is that the ServicePrincipal has not permission to execute DSC configurations on the VMs.
The deployment stop in that step, executing the DSC extensions
{ “id”: “/subscriptions/952acaff-1352-4fcd-9845-8400184a416e/resourceGroups/PGWVD/providers/Microsoft.Resources/deployments/rds.wvd-provision-host-pool-20191108121312/operations/435292D765D87E62”, “operationId”: “435292D765D87E62”, “properties”: { “provisioningOperation”: “Create”, “provisioningState”: “Failed”, “timestamp”: “2019-11-08T15:27:08.7814277Z”, “duration”: “PT2M54.5697843S”, “trackingId”: “3a25c745-38ca-4bef-98d1-a5c689b6c408”, “statusCode”: “Conflict”, “statusMessage”: { “status”: “Failed”, “error”: { “code”: “ResourceDeploymentFailure”, “message”: “The resource operation completed with terminal provisioning state ‘Failed’.”, “details”: [ { “code”: “VMExtensionProvisioningError”, “message”: “VM has reported a failure when processing extension ‘dscextension’. Error message: \”DSC Configuration ‘FirstSessionHost’ completed with error(s). Following are the first few: PowerShell DSC resource MSFT_ScriptResource failed to execute Set-TargetResource functionality with error message: User is not authorized to query the management service.\nActivityId: 25e7f858-c1bd-4957-ad3e-1843cbb1c4ef\nPowershell commands to diagnose the failure:\nGet-RdsDiagnosticActivities -ActivityId 25e7f858-c1bd-4957-ad3e-1843cbb1c4ef\n The SendConfigurationApply function did not succeed.\”.” } ] } }, “targetResource”: { “id”: “/subscriptions/952acaff-1352-4fcd-9845-8400184a416e/resourceGroups/PGWVD/providers/Microsoft.Compute/virtualMachines/PG-WVD-0/extensions/dscextension”, “resourceType”: “Microsoft.Compute/virtualMachines/extensions”, “resourceName”: “PG-WVD-0/dscextension” } }}
Which user or account is executing this deployment step?
Appreciate a lot your help.
Regards,
Javier
Erjen – I followed your blog to the dot and yet I get the same error 🙁
I don’t get errors/issues in any step. I have checked the output of Get-RDSTenant, Get-RDSRoleAssignment, Get-RDSContext and all outputs are as expected. I am not sure what may I missing.
Hi Erjen
we are also facing this error since weeks. It worked in the beginning but suddenly not anymore. We are in direct contact with the Microsoft support but no success.
One question. The user deploying the pool and the service principal has to be “RDS Owner”. The user has to be at least Contributor. What about the service principal itself. Dies the SP need any further permission on the subscription we are deploying in?
Thanks in advance
Jochim (Joe)
Hi Erjen,
Thank you for the excellent explanation. I’ve tried to implement this several times, but I am stuck at a point where all I get, no matter if I try to use a UPN or a Service Principal, is an error stating that the users is not authorized to query the management service.
“DSC Configuration ‘FirstSessionHost’ completed with error(s). Following are the first few: PowerShell DSC resource MSFT_ScriptResource failed to execute Set-TargetResource functionality with error message: User is not authorized to query the management service.
Do you have any suggestions on what could be wroing?
Thank you in advance for your help.
has anyone managed to get the UX template to work? Im getting a conflict error every time i deploy.
https://docs.microsoft.com/en-us/azure/virtual-desktop/manage-resources-using-ui#guidance-for-template-parameters
https://github.com/Azure/RDS-Templates/tree/master/wvd-templates/wvd-management-ux/deploy
raw error:
“code”: “DeploymentFailed”,
“message”: “At least one resource deployment operation failed. Please list deployment operations for details. Please see https://aka.ms/DeployOperations for usage details.”,
“details”: [
{
“code”: “Conflict”,
“message”: “{\r\n \”status\”: \”Failed\”,\r\n \”error\”: {\r\n \”code\”: \”ResourceDeploymentFailure\”,\r\n \”message\”: \”The resource operation completed with terminal provisioning state ‘Failed’.\”\r\n }\r\n}”
I had noticed that there two WVD applications under the wvd user and removed one, but still failing.
Hi Erjen, One of the global admin has created a WVD tenant. I am not a global admin can login with via add-rdsaccount but can run get-rdstenant command and get below not authorizes error what sort of role assignment is required
DeploymentUrl TenantGroupName UserName
————- ————— ——–
https://rdbroker.wvd.microsoft.com Default Tenant Group
Get-RdsTenant : User is not authorized to query the management service.
ActivityId: 68c4bb22-4d53-4df2-a214-be5d3fad17fa
Powershell commands to diagnose the failure:
Get-RdsDiagnosticActivities -ActivityId 68c4bb22-4d53-4df2-a214-be5d3fad17fa
At line:1 char:1
Erjen,
Thank a lot for the great article!
Can I ask you few questions about Azure WVD, please?
Is there a way to deploy WVD VMs and all related resources (avialbility set, network card, disks) with specific tags?
Is there a (easy) way to manage WVD hostpool? What if I want to increase number of VMs, add new users, check who is login and etc? Is there any GUI management console?
Thank you
hi Erjen
I get this error
VM has reported a failure when processing extension ‘dscextension’. Error message: \\”DSC Configuration ‘FirstSessionHost’ completed with error(s). Following are the first few: PowerShell DSC resource MSFT_ScriptResource failed to execute Set-TargetResource functionality with error message: User is not authorized to query the management service
I created the Service Principal and still, i cant get the WVD working any idea what i could try more?
Trying to just get `Add-RdsAccount -DeploymentUrl “https://rdbroker.wvd.microsoft.com”` commadn where it prompts me for credentials and i enter a user, e.g. wvdadmin@mydomain.onmicrosoft.com, that is member of aad global administrators role and it fails.
Also trying `$Credential = Get-Credential & Add-RdsAccount -DeploymentUrl “https://rdbroker.wvd.microsoft.com” -AadTenantId “” -Credential $Credential` and this prompts me for ServicePrincipal object which i don’t know how to create or if it has to be associated with any specific aad app registration and client secret setup.
I’m also curios why the azure wvd hostpool template wizard doesn’t ask for necessary details and set this all up for us versus a) expecting it to already be provisioned and b) expect us to know how to provision this obscure wvd hostpool setup dependency.
Dear Erjen
I have deployed WVD and it has been successful without any error.
But, I trying to RDP by WebClient gettting the below error.
We couldn’t connect to the gateway because of an error. If this keeps happening, ask your admin.
Please can you assist me to give any solution.
So I got everything up and running. I can sign into the app no problem. But when other accounts try they are getting “Couldn’t open this program”.
When I run this command i get
(Get-RdsDiagnosticActivities -TenantName CBP-Software -username blah.blah@yakidysmackidy.ca -detailed).Errors
ErrorSource : RAIL
ErrorOperation : RAILLaunchWin32App
ErrorCode : 2
ErrorCodeSymbolic :
ErrorMessage : ≤diagnosticCode=RdpInitShellExecuteFailure;filename=C:\users\default\desktop\CBP.lnk;directory=C:\u
sers\default\desktop\;params=;isDocument=0;connectionStage=RdpInitAppExecution≥
ErrorInternal : False
ReportedBy : RDStack
Time : 9/22/2020 1:12:30 PM